Friday, December 11, 2009

Form authentication in asp.net 2.0

Forms authentication has been made easier with a supply of readymade tools for repetitive tasks. ASP.NET 2.0 encapsulates all the best practices and provides built in solutions to virtually all the tasks relating to user databases, roles cached in cookies, controls for capturing user name and passwords, and administration tools for managing users and roles. Additionally ASP.NET 2.0 supports cookie-less semantics.

Cookie-less authentication can be implemented in several ways but ASP.NET prefers to pack the authentication ticket into the URL. It requires the ISAPI filter to intercept the request, extract the ticket and rewrite the correct path to the application. The filter, then exposes the authentication ticket as another request header. In this section of the tutorial we shall see how this can be implemented.

Forms authentication is driven by the contents of section within the section. The syntax of the section reads as follows. The various parts have been commented for ease of understanding.


The boxed in section of the code are the new features introduced by ASP.NET 2.0.

The FormsAuthentication class exposes some helper methods which are useful when adding authentication methods to an ASP.NET application. The static methods can be used to manipulate authentication tickets. For instance the user can call the RedirectformLoginPage method to redirect and authenticated user back to the original URL and SignOut can be used to remove the authentication ticket for the current user. There are a number of other methods that can be used to manipulate and renew the ticket and the associated cookie. Most of these deal with cookie naming and usage issues and are initialized with the values read from the applications configuration file when the application starts up.

CookieDomain is a property that returns the domain set for the authentication ticket. This property equals the domain attribute in the < forms > section.

The CookieMode returns one of the four FormsCookieMode enumeration values.

CookieSupported returns true if the current request supports cookies. When the AutoDetect mode is set, it checks for the browser’s cookie capability and verifies that cookies have not been disabled on the client.

DefaultUrl returns the configured or default URL for the page to return after the request has been successfully authenticated.

The EnableCrossAppRedirects as the name suggests, indicates whether redirects can span over different Web applications.

FormsCookieName returns the configured cookie name used for the current application. By default this name is .ASPXAUTH.

FormsCookiePath returns the configured cookie path used for the current application. The default path is the root path /.

LoginUrl returns the configured or default URL for the Login page. This matches the loginUrl configuration attribute.

RequireSSL gets the value that indicated whether a cookie must be transmitted using only HTTPS.

SlidingExpiration gets the value indicating whether sliding expiration is enabled.

A number of methods are supported by the FormsAuthentication class.

The Authenticate method is called to validate the credentials input by the user against those configured.

Decrypt returns a decrypted authentication ticket, when given a valid encrypted ticket obtained from a HTTP cookie.

Encrypt as the name suggests encrypts the authentication ticket in a form suitable for use in the HTTP cookie.

GetAuthCode creates an authentication code for a given username.

HashPasswordForStoringInConfigFile does what the name implies—hashes the password for storage in the web.config file.

Initialize is called when the application is first started and it initializes all the properties set. The method gets the cookie value and encryption keys to be used in the application.

RedirectToLoginPage is a new method that has been introduced to plug the holes in the programming interface. This method is used when the user signs out and he has to be redirected to the login page. The method identifies the login page and calls Response.Redirect.

RedirectFromLoginPage redirects the authenticated user back to the originally requested URL.

RenewticketIfOld conditionally updates the sliding expiration on an authentication ticket.

SetAuthCookie creates the authentication ticket and attaches it to the cookies collection of the outgoing response.

SignOut as stated earlier removes the authentication ticket.

The Form authentication layer is set up on top of a Web application. The web.config file is configured as under:

< authentication mode="Forms" >
............< forms loginUrl="login.aspx"
........................name=".ASPXFORMSAUTH" >
............< / forms >
< / authentication >
............
< authorization >
............< deny users="?" / >
< / authorization >

Note that the anonymous user is denied access in the authorization section of the code. All users must enter their credentials and be authenticated. A ticket must be obtained and encrypted in default and packed into a cookie with a default name.

ASP.NET 2.0 provides the developer with many security controls. The Login Control has only one task. It takes input from the user and validates the user name and password entered, confirms authentication or denies it. Let us see how this control works:

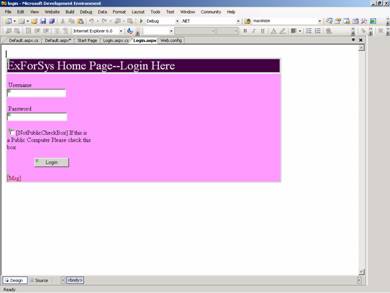
Create a web page with one page called login.aspx. Insert a table with two rows. In the First row insert a Label with the text “ExforSys Home Page--Login”. Now drag a Login control onto the page and examine the code that is formed on the page. Note that the task list of the control offers the user the option of Auto formatting the control choosing standard formats.

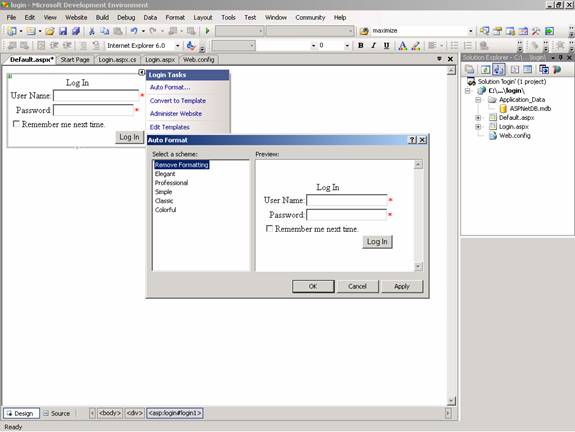
This is a kind of plug and play offer. Click on convert to Template in the tasklist and see the code generated.


Note that using the numerous properties built into this control it can be customized. See the sample of a custom control below. Note that the entire control has been created using the properties available for the control. By setting the section in the Web.Config a list of valid user names and passwords can be specified. If the login has to be validated against a database the same can be defined.


Developers must note that there are four events with which they can interact while customizing the control. BeforeLogin is raised before the authentication process begins. The syntax can be checked and the login can be stopped if required. AfterLogin is raised after authentication is completed successfully. The developer can pass additional routines. Authenticate can be used to provide customized authentication and LoginError can be used to give error messages whenever login fails or user data is incorrect.

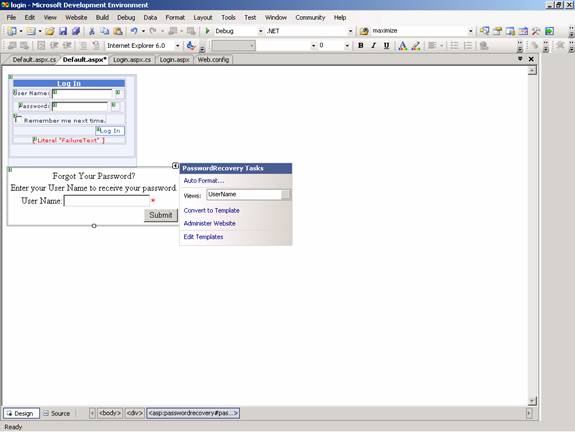
The Password Recovery Control helps users determine their forgotten passwords. Users will be prompted to enter their login name, answer the question for validation and the existing password will be mailed to them. If the password has been stored with a hash value in the database this becomes necessary. See the screenshot of the control as it appears when it is placed on the page.


The control must be enabled to send emails and the following code must be placed in the machine.config file. If a local SMTP service has been activated the setting can be left untouched.


< stmpMail
serverName=”localHost”
serverPort=”25”>
/ >


The data of the password message to be sent will have to be edited. The ‘from’ property of the MailDefinition will have to be set. Using the other definitions of the mailDefinition class other properties can also be defined. The highlight is the option to create a message based completely upon a template. This is a text file that resides in the root directory of the application. The < %UserName% > and < %Password% > can be used as placeholders.


The control offers three templates that can be built from the scratch or used with customization. UserName is the initial view of the control and it asks for the user name to be typed in. Question is used if the user is required to give an answer. Answer is shown if the password has been detected successfully or has been set back and the email has been sent. A few methods also come in handy while customizing the control. BeforeUserLookup is used before the control tries to look for the user. UserLookupError is returned if the user is not found or cannot be validated. BeforeAnswerLookup is used before the answer is checked. AnswerLookupError is used if the answer is found to be incorrect. BeforeSendEmail is raised before the email is sent to the user.


The LoginStatus and LoginName Controls are useful controls. The latter shows the name of the Logged in user while the former shows the status of the user. The LoginLink of the LoginStatus control automatically refers to the page in which it is placed.


The LoginView Control gives two different views depending on the authentication process. It helps in conditional display of pages for anonymous and authenticated users. In other words it is possible to create role based templates using this control.


This section of the tutorial was devoted to Authentication. However, ASP.NET 2.0 comes with a lot of features that help developers create roles and membership definitions. We shall be dealing with the Membership Management API in the next section of this tutorial.


Wednesday, October 28, 2009

Resize Image in asp.net in C#

This is a code in C# to resize an image. it takes two inputs as target image size and the image in byte format and it'll will return target sized image.

Some terms used in the code:-
Format24bppRgb - It specifies that formate is 24 bit per pixel and for each colour that is red, green and blue 8 bits are used


using System.Drawing;
using System.Drawing.Drawing2D;
using System.Drawing.Imaging;
using System.IO;

public class ImageClass
{

private static byte[] ResizeImageFile(byte[] imageFile, int targetSize)
{
using (System.Drawing.Image oldImage = System.Drawing.Image.FromStream(new MemoryStream(imageFile)))
{
Size newSize = CalculateDimensions(oldImage.Size, targetSize);//User defined function to calculate image dimensions
using (Bitmap newImage = new Bitmap(newSize.Width, newSize.Height, PixelFormat.Format24bppRgb))
{
using (Graphics canvas = Graphics.FromImage(newImage))
{
canvas.SmoothingMode = SmoothingMode.AntiAlias;//set rendering quality of canvas
canvas.InterpolationMode = InterpolationMode.HighQualityBicubic;//set interpolation mode to HighQualityBiubic
canvas.PixelOffsetMode = PixelOffsetMode.HighQuality;
canvas.DrawImage(oldImage, new Rectangle(new Point(0, 0), newSize));//drow image in canvas with new size and with specific starting location
MemoryStream m = new MemoryStream();
newImage.Save(m, ImageFormat.Jpeg);//define image formate in which it is to be shown
return m.GetBuffer();//return image as byte array
}
}
}
}

private static Size CalculateDimensions(Size oldSize, int targetSize)
{
Size newSize = new Size();

//change the size according to the widh and height
if (oldSize.Height > oldSize.Width)
{
newSize.Width = (int)(oldSize.Width * ((float)targetSize / (float)oldSize.Height));
newSize.Height = targetSize;
}
else
{
newSize.Width = targetSize;
newSize.Height = (int)(oldSize.Height * ((float)targetSize / (float)oldSize.Width));
}
return newSize;
}
}

Wednesday, September 30, 2009

Store PDF in sql server database in binary formate

Using this code we can upload pdf file to sql database table in binary type field.


using System;
using System.Data;
using System.Data.SqlClient;
using System.IO;

public class EmployeeData
{
public static void Main()
{
DateTime hireDate = DateTime.Parse("5/21/99");
AddEmployee("Jones", "Mary", "Sales Representative", hireDate, 5, "jones.bmp");
}

public static void AddEmployee(string lastName, string firstName, string title, DateTime hireDate , int reportsTo, string photoFilePath)
{
byte[] photo = GetPhoto(photoFilePath);

SqlConnection nwindConn = new SqlConnection("Data Source=localhost;Integrated Security=SSPI;Initial Catalog=Northwind;");

SqlCommand addEmp = new SqlCommand("INSERT INTO Employees (LastName, FirstName, Title, HireDate, ReportsTo, Photo) " +
"Values(@LastName, @FirstName, @Title, @HireDate, @ReportsTo, @Photo)", nwindConn);

addEmp.Parameters.Add("@LastName", SqlDbType.NVarChar, 20).Value = lastName;
addEmp.Parameters.Add("@FirstName", SqlDbType.NVarChar, 10).Value = firstName;
addEmp.Parameters.Add("@Title", SqlDbType.NVarChar, 30).Value = title;
addEmp.Parameters.Add("@HireDate", SqlDbType.DateTime).Value = hireDate;
addEmp.Parameters.Add("@ReportsTo", SqlDbType.Int).Value = reportsTo;

addEmp.Parameters.Add("@Photo", SqlDbType.Image, photo.Length).Value = photo;

nwindConn.Open();

addEmp.ExecuteNonQuery();

nwindConn.Close();
}

public static byte[] GetPhoto(string filePath)
{
FileStream fs = new FileStream(filePath, FileMode.Open, FileAccess.Read);
BinaryReader br = new BinaryReader(fs);

byte[] photo = br.ReadBytes((int)fs.Length);

br.Close();
fs.Close();

return photo;
}
}

Get all IP addresses on LAN

this is a simple vb.net code to retrieve all ip addresses on your local network.
remember to import System.Net.


Public Shared Function GetAllIPADDRESSES(Optional ByVal args As String() = Nothing) As Integer
'args in the signature is optional, without it
'the function will simply get the hostname
'of the local machine then go from there

Dim strHostName As New String("")
If args.Length = 0 Then
' Getting Ip address of local machine...
' First get the host name of local machine.
strHostName = DNS.GetHostName()
Console.WriteLine("Local Machine's Host Name: " + strHostName)
Else
strHostName = args(0)
End If

' Then using host name, get the IP address list..
Dim ipEntry As IPHostEntry = DNS.GetHostByName(strHostName)
Dim addr As IPAddress() = ipEntry.AddressList

Dim i As Integer = 0
While i < addr.Length
Console.WriteLine("IP Address {0}: {1} ", i, addr(i).ToString())
System.Math.Max(System.Threading.Interlocked.Increment(i), i - 1)
End While
Return 0
End Function

Tuesday, September 22, 2009

Crystal Report Example in asp.net

This code shows how to create Reports using ASP.NET Crystal Reports


Imports System
Imports System.Data
Imports System.Data.OleDb

Partial Class _Default
Inherits System.Web.UI.Page

Protected Sub Page_Load(ByVal sender As Object, ByVal e As System.EventArgs) Handles Me.Load

Dim ConnString As String = "Provider=Microsoft.Jet.OLEDB.4.0;Data Source=E:\vb.net projects\dept_mstr.mdb"
Dim myConnection As OleDbConnection = New OleDbConnection
myConnection.ConnectionString = ConnString

Dim ds As New DataSet
Dim da As New OleDbDataAdapter
Dim sql As String = "select distinct dept_no,dept_name from DEPARTMENT"
myConnection.Open()

Dim com As New OleDbCommand
Dim dbread
com = New OleDbCommand(sql, myConnection)
dbread = com.ExecuteReader
While dbread.read
DropDownList1.Items.Add(dbread.getVALUE(0))
DropDownList2.Items.Add(dbread.getstring(1))
End While

End Sub

Protected Sub CrystalReportViewer1_Init(ByVal sender As Object, ByVal e As System.EventArgs) Handles CrystalReportViewer1.Init

End Sub

Protected Sub Button1_Click(ByVal sender As Object, ByVal e As System.EventArgs) Handles Button1.Click
Dim Fltr
CrystalReportViewer1.ReportSource = "E:\WebSite2\crystalreport1.rpt"
Fltr = "{DEPARTMENT.dept_no}='" & Me.DropDownList1.Text & "' and '" & Me.DropDownList2.Text & "'"
CrystalReportViewer1.SelectionFormula = (Fltr)
End Sub
End Class

Use of Culture in asp.net

This sample code shows use of culture in asp.net


Design:

<form id="form1" runat="server">
<div>
Cultures: <asp:DropDownList id="ddlCulture" DataTextField="DisplayName"
DataValueField="Name" DataSourceID="GetCultureInfo" Runat="server" />
<asp:ObjectDataSource id="GetCultureInfo" TypeName="System.Globalization.CultureInfo"
SelectMethod="GetCultures" Runat="server">
<SelectParameters>
<asp:Parameter Name="types" DefaultValue="SpecificCultures" />
</SelectParameters>
</asp:ObjectDataSource>
<asp:Button id="btnSelect" Text="Select" Runat="server" onclick="btnSelect_Click"></asp:Button><br />
Date:<asp:Label id="lblDate" Runat="server" /><br />
Price : <asp:Label id="lblPrice" Runat="server" />
</div>
</form>


Web.Config:

<profile>
<properties>
<add
name="UserCulture"
defaultValue="en-US" />
<add
name="UserUICulture"
defaultValue="en" />
</properties>
</profile>


Code Behind:

protected override void InitializeCulture()
{
Culture = Profile.UserCulture;
UICulture = Profile.UserUICulture;
}

protected void btnSelect_Click(object sender, EventArgs e)
{
Profile.UserCulture = ddlCulture.SelectedValue;
Profile.UserUICulture = ddlCulture.SelectedValue;
//Response.Redirect(Request.Path);
}

void Page_PreRender()
{
lblDate.Text = DateTime.Now.ToString("D");
lblPrice.Text = (512.33m).ToString("c");
}

Saturday, August 29, 2009

All Connection Strings Sample

You have the .NET Framework on your local computer and you want to connect to a Microsoft Access database called database1.mdb located in the following folder on your hard disk: c:\database1.mdb. Here are the parameters to create this connection string:

Provider=Microsoft.Jet.OLEDB.4.0; Data Source=c:\database1.mdb;

OLE DB Provider for DB2 (from Microsoft)

For TCP/IP connections
oConn.Open = "Provider=DB2OLEDB;" & _
"Network Transport Library=TCPIP;" & _
"Network Address=xxx.xxx.xxx.xxx;" & _
"Initial Catalog=MyCatalog;" & _
"Package Collection=MyPackageCollection;" & _
"Default Schema=MySchema;" & _
"User ID=MyUsername;" & _
"Password=MyPassword"
For APPC connections

oConn.Open = "Provider=DB2OLEDB;" & _
"APPC Local LU Alias=MyLocalLUAlias;" & _
"APPC Remote LU Alias=MyRemoteLUAlias;" & _
"Initial Catalog=MyCatalog;" & _
"Package Collection=MyPackageCollection;" & _
"Default Schema=MySchema;" & _
"User ID=MyUsername;" & _
"Password=MyPassword"

ODBC Driver for Excel

oConn.Open "Driver={Microsoft Excel Driver (*.xls)};" & _
"DriverId=790;" & _
"Dbq=c:\somepath\mySpreadsheet.xls;" & _
"DefaultDir=c:\somepath"

ODBC Driver for MySQL (via MyODBC)
To connect to a local database (using MyODBC Driver)


oConn.Open "Driver={mySQL};" & _
"Server=MyServerName;" & _
"Option=16834;" & _
"Database=mydb"

To connect to a remote database


oConn.Open "Driver={mySQL};" & _
"Server=db1.database.com;" & _
"Port=3306;" & _
"Option=131072;" & _
"Stmt=;" & _
"Database=mydb;" & _
"Uid=myUsername;" & _
"Pwd=myPassword"

To connect to a local database (using MySQL ODBC 3.51 Driver)

oConn.Open "DRIVER={MySQL ODBC 3.51 Driver};" & _
"Server=myServerName;" & _
"Port=3306;" & _
"Option=16384;" & _
"Stmt=;" & _
"Database=mydatabaseName;" & _
"Uid=myUsername;" & _
"Pwd=myPassword"
Or
oConn.Open "DRIVER={MySQL ODBC 3.51 Driver};" & _
"SERVER=myServerName;" & _
"DATABASE=myDatabaseName;" & _
"USER=myUsername;" & _
"PASSWORD=myPassword;"

Count online users in asp.net (VB)

Place the following code in Global.asax file. Here, we track the active Sessions for our web application. There are three subroutines into which we will be looking to do this – Application_OnStart, Session_OnStart, Session_OnEnd.

Step-1 :
In the Application_OnStart subroutine, we have to set the user count to 0, when the server starts the application.

Sub Application_OnStart (Sender as Object, E as EventArgs)
' Set user count to 0 when start the application
Application("ActiveUsers") = 0
End Sub

Step-2 :
In the Session_OnStart subroutine, we have to increament the Activeuser by 1:

Sub Session_OnStart (Sender as Object, E as EventArgs)
Application.Lock
Application("ActiveUsers") = Cint(Application("ActiveUsers")) + 1
Application.UnLock
End Sub
In this case you have to set Timeout – you don’t need to put anything here, but the default Timeout is 20 minutes, so you can change it depending on the needs of your particular application.

To set the session start time, we add (Session(”Start”) = Now). Basically, when the user hits the site and opens a web page (asp.net page), at the time of opening the page, the session starts. Next, we increase the active visitors count when we start the session (Application(”ActiveUsers”) = Cint(Application(”ActiveUsers”)) + 1 ). The Application lock & unlock adds more stability to the counting.

Step-3 :
we must decrement the number of Active Users on the basis of online sessions in the Session_OnEnd subroutine:

Sub Session_OnEnd(Sender as Object, E as EventArgs)
Application.Lock
Application("ActiveUsers") = Cint(Application("ActiveUsers")) - 1
Application.UnLock
End Sub

Step-4 :
Then you can place the following code to access the Application(”ActiveUsers”) in .aspx file

<%
Dim intNumber as Integer
intNumber =Application("ActiveUsers")
response.write (intNumber )
%> Currently Online

Friday, August 28, 2009

Refreshing a asp.net web form automaticaly

This means: forcing a page postback or redirect from a client browser without explicit user input.

Why would you want to do that? The main reasons are:

Auto-redirecting to a new URL after a brief time period
Refreshing page information periodically
Maintaining a valid session state indefinitely
Forcing a specific process to run on the server when the client session has expired.
The following methods are the constructs we have used in our web development projects:

HTML header refresh tag

The most common and best known way - a tag of the following format is placed in the HTML section of the page:

<meta http-equiv="refresh" content="8;url=http://dotnet.org.za/">

where '8' refers to the number of seconds that will elapse before the page is refreshed;
'url' is the new url redirect to. It can be excluded which means the current page will be reloaded.
This construct is useful if you have one or two pages which have to auto-refresh, and works for any HTML content type forms. The downside is the refresh interval cannot be set dynamically, and if you are testing for session timeouts on your site, you'll have to embed this construct in every page of the site.

Response.AppendHeader method
ASP.NET provides the AppendHeader method to the Response object. Typically the page refresh can be set as follows in an ASP.NET webform (in C#):


this.Response.AppendHeader("Refresh",
Convert.ToString(Session.Timeout * 60 + 5));

Here the page refresh is set to 5 seconds after the client session timeout setting specified in the web.config file.

This construct is useful as it can be placed in a base webform OnLoad() or Page_Load() response method. All derived webforms will then have the same page refresh setting when they are loaded. Obviously, if the timeout value is changed in the web.config file, no modification is required in this code and everything still works fine.

Page OnLoad method script
The same thing can be done by setting a script for the client-side HTML using the HtmlGenericControl.Attributes collection:


string onload = "window.setTimeout(
'window.location.href=window.location.href'," +
Convert.ToString( (Session.Timeout * 60 + 5) * 1000) + ");";
this.body.Attributes.Add("onload", onload);

Unfortunately, to get this to work you need to add the following attribute to the tag in the HTML:

runat="server"

and the following member in the webform code-behind class:

protected System.Web.UI.HtmlControls.HtmlGenericControl body;

Hmmm - so why do this, if it means that we have to fiddle with the HTML?

In our experience, certain ASP.NET controls in the webform actually kills the working of the previous two constructs - but this method always seems to work....regardless...in Internet Explorer...

Tuesday, August 25, 2009

Encryption and Decryption without .net APIs

This code is for encrypting and then decrypting any string. here we use teo strings NORMAL and ENCRYPT. in this method we pick characters from input and and get its index from NORMAL string and character at the same index in ENCRYPT string is replaces by original character. reverse process is used for decryption.

string NORMAL = "ABCDEFGHIJKLMNOPQRSTUVWXYZ0123456789";
string ENCRYPT = "YO17KPLVSU50C8WE64GAI3MB2DFNZQ9JXTRH";
string strInput = "NikhilGaur";
string strEncrypted = string.Empty;
string strDecrypted = string.Empty;
string strNewChar;
string strLtr;
int iIdx;
protected EncryptionDecryptionDemo()
{
Response.Write("Original String : " + strInput);
Response.Write("
");
for (int i = 0; i < strInput.Length; i++)
{
strLtr = strInput.Substring(i, 1).ToUpper();
iIdx = NORMAL.IndexOf(strLtr);
strNewChar = ENCRYPT.Substring(iIdx, 1).ToUpper();
strEncrypted += strNewChar;
}
Response.Write("Encrypted string : " + strEncrypted);
Response.Write("
");

for (int i = 0; i < strInput.Length; i++)
{
strLtr = strEncrypted.Substring(i, 1).ToUpper();
iIdx = ENCRYPT.IndexOf(strLtr);
strNewChar = NORMAL.Substring(iIdx, 1).ToUpper();
strDecrypted += strNewChar;
}
Response.Write("Decrypted string(Original again :" + strDecrypted);
}

If you want to use any special characters you can add in variable "NORMAL" and equivalent encrypted value in variable "ENCRYPT".
"ENCRYPT" variable has the reordered letters of "NORMAL" variable.

Sunday, August 16, 2009

Difference between web services & remoting?

Remoting and Web Services are ways of communication between applications.

In Remoting, the applications involved in the communication process may be located on the same computer, different computers in a same or different network. A proxy of an application object is created on the other application.

Web Services - Communication between applications using web services is platform independent and programming independent. The application that consumes the web service, simply accesses it, without needing to know how this web service has actually been implemented & created.
It allows Distributed Applications to share Business Logic over Internet.
Differences between both:

1.Web Service are Stateless, whereas Remoting has support for both stateless and with-state environment, which is achieved using Singleton and Singlecall activation
2.ASP.NET provides good support to create Web Services. They are easy to deploy.Remoting is little complex.
3. In Remoting the applications involved in the communication should be built on .Net.
4.ASP.NET Web Services may be accessed using HTTP only. Remoting objects may be accessed over any protocol like TCP, SMTP, HTTP.

Interview Questions in Windows Form.

• What is the difference between Debug.Write and Trace.Write? When should each be used?
The Debug.Write call won't be compiled when the DEBUGsymbol is not defined (when doing a release build). Trace.Write calls will be compiled. Debug.Write is for information you want only in debug builds, Trace.Write is for when you want it in release build as well.

• Difference between Anchor and Dock Properties?
Dock Property->Gets or sets which edge of the parent container a control is docked to. A control can be docked to one edge of its parent container or can be docked to all edges and fill the parent container. For example, if you set this property to DockStyle.Left, the left edge of the
control will be docked to the left edge of its parent control. Additionally, the docked edge of the control is resized to match that of its container
control.
Anchor Property->Gets or sets which edges of the control are anchored to the edges of its container. A control can be anchored to one or more edges of its parent container. Anchoring a control to its parent ensures that the anchored edges remain in the same position relative to the edges of the parent container when the parent container is resized.

• When would you use ErrorProvider control?
ErrorProvider control is used in Windows Forms application. It is like Validation Control for ASP.NET pages. ErrorProvider control is used to provide validations in Windows forms and display user friendly messages to the user if the validation fails.
E.g
If we went to validate the textBox1 should be empty, then we can validate as below
1). You need to place the errorprovide control on the form
private void textBox1_Validating(object sender, System.ComponentModel.CancelEventArgs e)
{
ValidateName();
}
private bool ValidateName()
{
bool bStatus = true;
if (textBox1.Text == "")
{
errorProvider1.SetError (textBox1,"Please enter your Name");
bStatus = false;
}
else
errorProvider1.SetError (textBox1,"");
return bStatus;
}
it check the textBox1 is empty . If it is empty, then a message Please enter your name is displayed.

• Can you write a class without specifying namespace? Which namespace does it belong to by default??
Yes, you can, then the class belongs to global namespace which has no name. For commercial products, naturally, you wouldn't want global namespace.

• You are designing a GUI application with a windows and several widgets on it. The user then resizes the app window and sees a lot of grey space, while the widgets stay in place. What's the problem?
One should use anchoring for correct resizing. Otherwise the default property of a widget on a form is top-left, so it stays at the same location when resized.

• How can you save the desired properties of Windows Forms application?
.config files in .NET are supported through the API to allow storing and retrieving information. They are nothing more than simple XML files, sort of like what .ini files were before for Win32 apps.

• So how do you retrieve the customized properties of a .NET application from XML .config file?
Initialize an instance of AppSettingsReader class. Call the GetValue method of AppSettingsReader class, passing in the name of the property and the type expected. Assign the result to the appropriate variable.

• Can you automate this process?
In Visual Studio yes, use Dynamic Properties for automatic .config creation, storage and retrieval.

• My progress bar freezes up and dialog window shows blank, when an intensive background process takes over.
Yes, you should've multi-threaded your GUI, with taskbar and main form being one thread, and the background process being the other.

• What's the safest way to deploy a Windows Forms app?
Web deployment: the user always downloads the latest version of the code, the program runs within security sandbox, properly written app will not require additional security privileges.

• Why is it not a good idea to insert code into InitializeComponent method when working with Visual Studio?
The designer will likely through it away, most of the code inside InitializeComponent is auto-generated.

• What's the difference between WindowsDefaultLocation and WindowsDefaultBounds?
WindowsDefaultLocation tells the form to start up at a location selected by OS, but with internally specified size. WindowsDefaultBounds delegates both size and starting position choices to the OS.

• What's the difference between Move and LocationChanged? Resize and SizeChanged?
Both methods do the same, Move and Resize are the names adopted from VB to ease migration to C#.

• How would you create a non-rectangular window, let's say an ellipse?
Create a rectangular form, set the TransparencyKey property to the same value as BackColor, which will effectively make the background of the form transparent. Then set the FormBorderStyle to FormBorderStyle.None, which will remove the contour and contents of the form.

• How do you create a separator in the Menu Designer?
A hyphen '-' would do it. Also, an ampersand '&\' would underline the next letter.

• How's anchoring different from docking?
Anchoring treats the component as having the absolute size and adjusts its location relative to the parent form. Docking treats the component location as absolute and disregards the component size. So if a status bar must always be at the bottom no matter what, use docking. If a button should be on the top right, but change its position with the form being resized, use anchoring.

• How do you trigger the Paint event in System.Drawing?
Invalidate the current form, the OS will take care of repainting. The Update method forces the repaint.

• With these events, why wouldn't Microsoft combine Invalidate and Paint, so that you wouldn't have to tell it to repaint, and then to force it to repaint?
Painting is the slowest thing the OS does, so usually telling it to repaint, but not forcing it allows for the process to take place in the background.

• How can you assign an RGB color to a System.Drawing.Color object?
Call the static method FromArgb of this class and pass it the RGB values.

• What class does Icon derive from?
Isn't it just a Bitmap with a wrapper name around it? No, Icon lives in System.Drawing namespace. It's not a Bitmap by default, and is treated separately by .NET. However, you can use ToBitmap method to get a valid Bitmap object from a valid Icon object.

• Before in my VB app I would just load the icons from DLL. How can I load the icons provided by .NET dynamically?
By using System.Drawing.SystemIcons class, for example System.Drawing.SystemIcons.Warning produces an Icon with a warning sign in it.

• When displaying fonts, what's the difference between pixels, points and ems?
A pixel is the lowest-resolution dot the computer monitor supports. Its size depends on user's settings and monitor size. A point is always 1/72 of an inch. An em is the number of pixels that it takes to display the letter M.

Saturday, August 15, 2009

Check if date and time is between two date and times

This javascript code checks whether the checkDate is between beginDate and endDate and generates a MessabeBox


function dateWithin(beginDate,endDate,checkDate) {
var b,e,c;
b = Date.parse(beginDate);
e = Date.parse(endDate);
c = Date.parse(checkDate);
if((c <= e && c >= b)) {
return true;
}
return false;
}

// This will alert 'false'
alert(dateWithin('12/20/2007 12:00:00 AM','12/20/2007 1:00:00 AM','12/19/2007 12:00:00 AM'));


Thanks

Happy Programming.

Move GridView Rows with up and down keys

To add client-side script event to the row to handle the event onKeyDown (we can use onKeyUp or Press also if we would like) we hook up to the GridView’s RowDataBoundEvent to make access to the current row that will be data bound. We can use the GridViewRowEventArgs’s Row property to get access to the current row. By using the Attri butes collection of t he Row property we can easy add attributes to our GridView (In this case the <tr> element that the GridView will render for us). We need to add three attributes to the row, id (to unique identify the row on the client-side), onKeyDown (to see if we press t he down or up button, for moving the marker) and the onClick (to make sure we can select a row and start moving from the selected row). The following code will add the “id” attribute to the <tr> element and it will only have the value of a counter (only to make this example simple), it will also add the onKeyDown event and call the method SelectRow when a key is pressed, and to the last the onClick event to make sure to select a start row:


private int _i = 0;

protected void GridView1_RowDataBound(object sender, GridViewRowEventArgs e)
{
if (e.Row.RowType == DataControlRowType.DataRow && (e.Row.RowState == DataControlRowState.Alternate || e.Row.RowState == DataControlRowState.Normal))
{
e.Row.Attributes.Add("id", _i.ToString());
e.Row.Attributes.Add("onKeyDown", "SelectRow();");
e.Row.Attributes.Add("onClick", "MarkRow(" + _i.ToString() + ");");

_i++;
}
}


The code above will make sure the GridView will render something similar to (at runtime):


<table cellspacing="0" rules="all" border="1" id="GridView1" style="border-collapse:collapse;">
<tr>
<th scope="col">CategoryID</th><th scope="col">Name</th>
</tr>
<tr id="0" onKeyDown="SelectRow();" onClick="MarkRow(0);">
<td>1</td><td>.Net 1.1</td>
</tr>
<tr id="1" onKeyDown="SelectRow();" onClick="MarkRow(1);">
<td>2</td><td>.Net Framework 2.0</td>
</tr><tr id="2" onKeyDown="SelectRow();" onClick="MarkRow(2);">
<td>3</td><td>ADO.Net 2.0</td>
</tr>
</table>
As you can see in the code above, the attribute id, onKeyDown and onClick is added to the <tr> element. The onClick event will call the MarkRow method and pass the current row as an argument to make sure the row we click on will be marked and used as a start row.

Now when we have done this, we need to add the client-side code that should handle the movement of the marker etc. We can start with the MarkRow method that will be used to mark a row (change its background color):


var currentRowId = 0;

function MarkRow(rowId)
{
if (document.getElementById(rowId) == null)
return;

if (document.getElementById(currentRowId) != null )
document.getElementById(currentRowId).style.backgroundColor = '#ffffff';

currentRowId = rowId;
document.getElementById(rowId).style.backgroundColor = '#ff0000';
}

The MarkRow will make sure a row will be marked and that a previous marked row will be remarked. The MarkRow takes one argument, rowId, which have the value of the row id to mark. The MarkRow will not do anything if the element with the specified rowId can’t be found (this will happen if we try to move out from the GridView when moving the marker with the up or down key). The curretnRowId which is a global variable will be set to the current marked row, to keep track on which row that is selected. To remark a previous selected row we use the doecument.getElementById method to get the <tr> element with the currentRowId and see if it’s not null. If it’s not null a row is already selected and we need to clear its background color (The background color of the row is used to show what row is marked). After we have cleared a selected row, we set the currentRowId to the rowId that is passed as an argument to the MarkRow method. After this is done we set the background color of the selected row to a background color used to display that the row is marked.

The MarkRow will be called when the onClick event is fired and it will make sure to set the currentRowId to the row that we have clicked on to be the start row (from where we can move the marker with the up and down key). It will also be called when we press the key up or down button to mark a new row. The method that handles the up and down keys is the SelectRow:


function SelectRow()
{
if (event.keyCode == 40)
MarkRow(currentRowId+1);
else if (event.keyCode == 38)
MarkRow(currentRowId-1);
}


The SeletRow method will check if the down key is pressed (keyCode = 40) or if the up key is pressed (keyCode = 38). Note: I’m so bad of naming methods so have that in mind, but I use the name SelectRow because when a key is pressed a row should be selected ;)

When the down key is pressed, the MarkRow method will be called with the currentRowId as an argument. The currentRowId has the value of the id (which is the value of the “counter” that can also represents the index of a row) and add 1 to the id, so if we start or movement from row with id 1, we will move to row with the id 2. If we press the up key, we will decrease 1 from the current row, so if we start to move up from row with id 2, we will move to row with the id 1.
Here is the whole code:

Default.aspx.cs :


public partial class _Default : System.Web.UI.Page
{
private int _i = 0;

protected void GridView1_RowDataBound(object sender, GridViewRowEventArgs e)
{
if (e.Row.RowType == DataControlRowType.DataRow && (e.Row.RowState == DataControlRowState.Alternate || e.Row.RowState == DataControlRowState.Normal))
{
e.Row.Attributes.Add("id", _i.ToString());
e.Row.Attributes.Add("onKeyDown", "SelectRow();");
e.Row.Attributes.Add("onClick", "MarkRow(" + _i.ToString() + ");");

_i++;
}
}
}

Default.aspx :


<%@ Page Language="C#" AutoEventWireup="true" CodeFile="Default.aspx.cs" Inherits="_Default" %>

<%@ Register Src="WebUserControl.ascx" TagName="WebUserControl" TagPrefix="uc1" %>

<!DOCTYPE html PUBLIC "-//W3C//DTD XHTML 1.0 Transitional//EN" "http://www.w3.org/TR/xhtml1/DTD/xhtml1-transitional.dtd">

<html xmlns="http://www.w3.org/1999/xhtml" >
<head runat="server">
<title>Untitled Page</title>
<script type="text/javascript">

var currentRowId = 0;

function SelectRow()
{
if (event.keyCode == 40)
MarkRow(currentRowId+1);
else if (event.keyCode == 38)
MarkRow(currentRowId-1);
}

function MarkRow(rowId)
{
if (document.getElementById(rowId) == null)
return;

if (document.getElementById(currentRowId) != null )
document.getElementById(currentRowId).style.backgroundColor = '#ffffff';

currentRowId = rowId;
document.getElementById(rowId).style.backgroundColor = '#ff0000';
}

</script>
</head>
<body>
<form id="form1" runat="server">
<asp:GridView ID="GridView1" runat="server" AutoGenerateColumns="False" DataKeyNames="CategoryID"
DataSourceID="SqlDataSource1" OnRowDataBound="GridView1_RowDataBound">
<Columns>
<asp:BoundField DataField="CategoryID" HeaderText="CategoryID" InsertVisible="False"
ReadOnly="True" SortExpression="CategoryID" />
<asp:BoundField DataField="Name" HeaderText="Name" SortExpression="Name" />
</Columns>
</asp:GridView>
<asp:SqlDataSource ID="SqlDataSource1" runat="server" ConnectionString="<%$ ConnectionStrings:MyBlogConnectionString %>"
SelectCommand="SELECT [CategoryID], [Name] FROM [Categories]"></asp:SqlDataSource>

</form>
</body>
</html>

Read a file's content from a remote webserver using the HttpWebRequest class

The HttpWebRequest class allows you to programatically make web requests against an HTTP server.

This code shows how to read a file's content from a remote webserver using the HttpWebRequest class.

Visual basic :

If Not (IsPostBack) Then
Try
Dim fr As System.Net.HttpWebRequest
Dim targetURI As New Uri("http://weblogs.asp.net/farazshahkhan")

fr = DirectCast(System.Net.HttpWebRequest.Create(targetURI), System.Net.HttpWebRequest)
'In the above code http://weblogs.asp.net/farazshahkhan is used as an example
'it can be a different domain with a different filename and extension
If (fr.GetResponse().ContentLength > 0) Then
Dim str As New System.IO.StreamReader(fr.GetResponse().GetResponseStream())
Response.Write(str.ReadToEnd())
str.Close();
End If

Catch ex As System.Net.WebException
Response.Write("File does not exist.")
End Try
End If


C# :

if (!(IsPostBack))
{
try
{
System.Net.HttpWebRequest fr;
Uri targetUri = new Uri("http://weblogs.asp.net/farazshahkhan");
fr = (System.Net.HttpWebRequest)System.Net.HttpWebRequest.Create(targetUri);
//In the above code http://weblogs.asp.net/farazshahkhan is used as an example
//it can be a different domain with a different filename and extension
if ((fr.GetResponse().ContentLength > 0))
{
System.IO.StreamReader str = new System.IO.StreamReader(fr.GetResponse().GetResponseStream());
Response.Write(str.ReadToEnd());
if (str != null) str.Close();
}
}
catch (System.Net.WebException ex)
{
Response.Write("File does not exist.");
}
}


How to export GridView to Word in asp.ner C#

In tutorial, we need "AddHeader" and "ContentType" to do the work.The AddHeader method adds a new HTML header and value to the response sent to the client. It does not replace an existing header of the same name. After a header has been added, it cannot be removed. The ContentType property specifies the HTTP content type for the response. If no ContentType is specified, the default is text/HTML.

This tutorial will show you how to export GridView to Word using ASP.NET 2.0 and C#.

First,you need to import the namespace from System.Data.SqlClient.

using System.Data.SqlClient;
We chose Server Intellect for its dedicated servers, for our web hosting. They have managed to handle virtually everything for us, from start to finish. And their customer service is stellar.

The System.Data.SqlClient namespace contains The System.Data.SqlClient namespace is the .NET Framework Data Provider for SQL Server.The .NET Framework Data Provider for SQL Server describes a collection of classes used to access a SQL Server database in the managed space. In tutorial, we need "AddHeader" and "ContentType" to do the work.The AddHeader method adds a new HTML header and value to the response sent to the client. It does not replace an existing header of the same name. After a header has been added, it cannot be removed. The ContentType property specifies the HTTP content type for the response. If no ContentType is specified, the default is text/HTML.

We use the Button1_Click event to do the work. We then call "Response.AddHeader" to export a file which is named FileName.doc. We then use "Response.ContentType" to denotes the type of the file being exported.

protected void Button1_Click(object sender, EventArgs e)
{
Response.Clear();
Response.Buffer = true;

Response.AddHeader("content-disposition", "attachment;filename=FileName.doc");

Response.ContentEncoding = System.Text.Encoding.UTF7;
Response.ContentType = "application/vnd.word";
System.IO.StringWriter oStringWriter = new System.IO.StringWriter();
System.Web.UI.HtmlTextWriter oHtmlTextWriter = new System.Web.UI.HtmlTextWriter(oStringWriter);
this.GridView1.RenderControl(oHtmlTextWriter);
Response.Output.Write(oStringWriter.ToString());
Response.Flush();
Response.End();
}

public override void VerifyRenderingInServerForm(Control control)
{

}
We migrated our web sites to Server Intellect over one weekend and the setup was so smooth that we were up and running right away. They assisted us with everything we needed to do for all of our applications. With Server Intellect's help, we were able to avoid any headaches!

The front end GridViewExportWordVB.aspx page looks something like this:


<asp:Button ID="Button1" runat="server" OnClick="Button1_Click" Text="Export to Word" Width="99px" />
<asp:GridView ID="GridView1" runat="server"> </asp:GridView>


Need help with Windows Dedicated Hosting? Try Server Intellect. I'm a happy customer!

The flow for the code behind page is as follows.

using System;
using System.Data;
using System.Configuration;
using System.Web;
using System.Web.Security;
using System.Web.UI;
using System.Web.UI.WebControls;
using System.Web.UI.WebControls.WebParts;
using System.Web.UI.HtmlControls;
using System.Text;
using System.Data.SqlClient;

public partial class _Default : System.Web.UI.Page
{
string ConnectionString = "Data Source=(local);Initial Catalog=pubs;User Id=sa;Password=sa123";
SqlConnection cn1;

protected void Page_Load(object sender, EventArgs e)
{
if (!Page.IsPostBack)
{
SqlConnection cn = new SqlConnection(ConnectionString);
cn.Open();
cn1 = new SqlConnection(ConnectionString);
cn1.Open();
SqlCommand cmd = new SqlCommand("select * from [authors]", cn);
SqlDataReader dr = cmd.ExecuteReader(CommandBehavior.CloseConnection);
GridView1.DataSource = dr;
GridView1.DataBind();
dr.Close();
cmd.Dispose();
cn.Dispose();
cn1.Dispose();
cn = cn1 = null;
}
}

protected void Button1_Click(object sender, EventArgs e)
{
Response.Clear();
Response.Buffer = true;

Response.AddHeader("content-disposition", "attachment;filename=FileName.doc");

Response.ContentEncoding = System.Text.Encoding.UTF7;
Response.ContentType = "application/vnd.word";
System.IO.StringWriter oStringWriter = new System.IO.StringWriter();
System.Web.UI.HtmlTextWriter oHtmlTextWriter = new System.Web.UI.HtmlTextWriter(oStringWriter);
this.GridView1.RenderControl(oHtmlTextWriter);
Response.Output.Write(oStringWriter.ToString());
Response.Flush();
Response.End();
}

public override void VerifyRenderingInServerForm(Control control)
{

}
}

Monday, August 10, 2009

Embedding the image using image URL

Here We have to discuss about , how to embed the image to an email actually , Embedding an image will affect performance so here , i am passing the image URL directly to the body tag

so , here the code..


try

{

MailMessage mail = new MailMessage();

mail.To.Add("user@gmail.com");

mail.From = new MailAddress("admin@support.com");

mail.Subject = "Test with Image";

string Body = "<b>Welcome to Pass Image URL to Email Body!</b><br><BR>Online resource for .net articles.<BR><img alt=\"\" hspace=0 src='http://www.idealsd.co.uk/images/addmenu.jpg' align=baseline border=0 >";


AlternateView htmlView = AlternateView.CreateAlternateViewFromString(Body, null, "text/html");

mail.AlternateViews.Add(htmlView);

SmtpClient smtp = new SmtpClient();

smtp.Host = "smtp.gmail.com";

//specify your smtp server name/ip here
smtp.EnableSsl = true;

//enable this if your smtp server needs SSL to communicate
smtp.Credentials = new NetworkCredential("Username", "password");

// smtp.DeliveryMethod = SmtpDeliveryMethod.PickupDirectoryFromIis;

smtp.Send(mail);

}

catch (Exception ex)

{

Response.Write(ex.Message);

}

Embedding the image with an Email

We have to discuss about how to Embed an image to Email Previous Article we are discussed passing image URL directly to body tag of Email.

So , now we Embed a Image directly to Email

See the example...


try

{

MailMessage mail = new MailMessage();

mail.To.Add("user@gmail.com");

mail.From = new MailAddress("admin@support.com");

mail.Subject = "Test with Image";

string Body = "<b> Welcome to Embed image!</b><br><BR>Online resource for .net articles.<BR><img alt=\"\" hspace=0 src=\"cid:imageId\" align=baseline border=0 >";


AlternateView htmlView = AlternateView.CreateAlternateViewFromString(Body, null, "text/html");

LinkedResource imagelink = new LinkedResource(Server.MapPath(".") + @"\images\sample.jpg", "image/jpg");


imagelink.ContentId = "imageId";

imagelink.TransferEncoding = System.Net.Mime.TransferEncoding.Base64;

htmlView.LinkedResources.Add(imagelink);

mail.AlternateViews.Add(htmlView);

SmtpClient smtp = new SmtpClient();

smtp.Host = "smtp.gmail.com";

//specify your smtp server name/ip here
smtp.EnableSsl = true;

//enable this if your smtp server needs SSL to communicate
smtp.Credentials = new NetworkCredential("username", "password");

// smtp.DeliveryMethod = SmtpDeliveryMethod.PickupDirectoryFromIis;

smtp.Send(mail);

}

catch (Exception ex)

{

Response.Write(ex.Message);

}

DeCompress the file using asp.net

In previous post we seen how to compress the file this will helpful when the file is large you can
compress the file.

Now we will see how to Decompress the file

Button_Click event.


DecompressFile(Server.MapPath("~/Decompressed/FindEmai_onTextfile.zip"),Server.MapPath("~/Decompressed/FindEmai_onTextfile.txt"));

Here i just swap the filename so it may confuse so use some different path(Folder) or filename

Decompress Method

public static void DecompressFile(string sourceFileName, string destinationFileName)
{

FileStream outStream;

FileStream inStream;

//Check if the source file exist.

if (File.Exists(sourceFileName))
{

//Read teh input file

inStream = File.OpenRead(sourceFileName);

//Check if the destination file exist else create once

outStream = File.Open(destinationFileName, FileMode.OpenOrCreate);

//Now create a byte array to hold the contents of the file

//Now increase the filecontent size more since the compressed file

//size will always be less then the actuak file.

byte[] fileContents = new byte[(inStream.Length * 100)];

//Read the file and decompress

GZipStream zipStream = new GZipStream(inStream, CompressionMode.Decompress, false);

//Read the contents to this byte array

int totalBytesRead = zipStream.Read(fileContents, 0, fileContents.Length);

outStream.Write(fileContents, 0, totalBytesRead);

//Now close all the streams.

zipStream.Close();

inStream.Close();

outStream.Close();

}

}

Compress the file using asp.net application

we are going to discuss about how to compress the file using asp.net application , ie: for compression there are some third party tools like CSharpZip (not sue about the name of the tools..) ,gzip, etc..

Asp.net has inbuilt with Compression ie: derive from the Class

using System.IO.Compression;

There are two compression derived from this namespace.
1) Gzipstream
2) Deflate stream

Deflate seems to be must faster than the Gzipstream but Deflate doesn't uncompress other formats , but Gzipstream decompress the other files like winzip, winrar .

Now we are going to see Gzipstream it has a class which contains filename and compression mode , Compression mode has two values Compress and Decompress.

Button_ClickEvent

CompressFile(Server.MapPath("~/Decompressed/FindEmai_onTextfile.txt"),Server.MapPath("~/Decompressed/FindEmai_onTextfile.zip"));

Here you have to give two parameter first one is Sourcefilename to be compressed , second is path where you have to place the compressed file. it will check if the file exists the compressed file has been placed there, else it will create on the fly.

Method definition

public static void CompressFile(string sourceFileName, string destinationFileName)
{

FileStream outStream;

FileStream inStream;

//Check if the source file exist.

if (File.Exists(sourceFileName))
{

//Read teh input file

//Check if the destination file exist else create once

outStream = File.Open(destinationFileName, FileMode.OpenOrCreate);

GZipStream zipStream = new GZipStream(outStream, CompressionMode.Compress);

//Now create a byte array to hold the contents of the file

byte[] fileContents = new byte[inStream.Length];

//Read the contents to this byte array

inStream.Read(fileContents, 0, fileContents.Length);

zipStream.Write(fileContents, 0, fileContents.Length);

//Now close all the streams.

zipStream.Close();

inStream.Close();

outStream.Close();

}

}

Send attachment with email

Now we will see , how to send an attachment to the email.

for the you have to create an instance for Attachment class and pass the filename and specify the media type information for an email message attachements and set the ContentDisposition which specify the file type whether its txt , doc, gif,jpg etc..,

Import NameSpace

using System.Net.Mail;
using System.Net.MIME;
using System.Net;

Code

try
{

MailMessage mail = new MailMessage();

mail.To.Add("venkat@gmail.com");

mail.From = new MailAddress("admin@Support.com");

mail.Subject = "Testing Email Attachment";

string file = Server.MapPath("~/files/findemai_ontextfile.txt");

Attachment attachFile = new Attachment(file, MediaTypeNames.Application.Octet);

ContentDisposition disposition = attachFile.ContentDisposition;

mail.Attachments.Add(attachFile);

SmtpClient smtp = new SmtpClient();

smtp.Host = "smtp.gmail.com";

smtp.EnableSsl = true;

smtp.Credentials = new NetworkCredential("xxxxxxx@gmail.com", "*********");
s;

smtp.Send(mail);

}

catch (Exception ex)
{

Response.Write(ex.Message);

}

This link helps you :
http://msdn.microsoft.com/en-us/library/system.net.mail.attachment.aspx

Refresh the parent window by Closing the popup window

Here we will discuss How to Refresh the parent window by Closing the popup window

Passing the function on your button ie: place Close button on you popup If you click the Close Button , it will close the popup and refresh the parent page.

<script>
function refreshParent() {
window.opener.location.href = window.opener.location.href;

if (window.opener.progressWindow)

{
window.opener.progressWindow.close()
}
window.close();

}
</script>

Wednesday, July 29, 2009

Storing User Profile in custom table using CreateUserWizard control

I discussed how you can add extra controls to CreateUserWizard(CUW) Control in the previous blog post.

Assuming you have gone through the post above, what we will do here is store this extra information collected in CUW into a custom database.

Other option is storing in asp.net Profiles. Check References section at the end to see how to store user information in profiles.

Add Extra Fields to CUW Control:

Lets say we want to collect FirstName and LastName of the User while creating a user.With the help of previous post add two textboxes namely FirstName and LastName. Add Validation controls accordinly.

Create a Custom Table to store User Profile(here FirstName and LastName)

  1. Add a new Table to your Membership Database. Here I have named it User_Profile.
  2. Add 3 columns namely UserId - type uniqueidentifier, FirstName - type varchar(50) and LastName - type varchar(50)
  3. Set UserId as Primary Key
  4. Create a Foreign key relationship between UserId of User_Profile table and aspnet_Users table.
So once you have your table ready to store the information lets go ahead and look at the code how to insert values into it.

Inserting FirstName and LastName into User_Profile

We will use the CreatedUser event of CUW control to do this job. In the design Mode, double click the Create User button. In the code behind for CreateUser page you will see an event handler added for CreatedUser event. Here is the code that says the rest:

protected void CreateUserWizard1_CreatedUser(object sender, EventArgs e)
{

// Get the UserId of the just-added user
MembershipUser newUser = Membership.GetUser(CreateUserWizard1.UserName);

Guid newUserId = (Guid)newUser.ProviderUserKey;

//Get Profile Data Entered by user in CUW control
String FirstName = ((TextBox)CreateUserWizard1.CreateUserStep.ContentTemplateContainer.FindControl("FirstName")).Text;

String LastName = ((TextBox)CreateUserWizard1.CreateUserStep.ContentTemplateContainer.FindControl("LastName")).Text;
// Insert a new record into User_Profile

// Get your Connection String from the web.config. MembershipConnectionString is the name I have in my web.config

string connectionString = ConfigurationManager.ConnectionStrings["MembershipConnectionString"].ConnectionString;
string insertSql = "INSERT INTO User_Profile(UserId,FirstName, LastName) VALUES(@UserId, @FirstName, @LastName)";

using (SqlConnection myConnection = new SqlConnection(connectionString))
{

myConnection.Open();

SqlCommand myCommand = new SqlCommand(insertSql, myConnection);

myCommand.Parameters.AddWithValue("@UserId", newUserId);
myCommand.Parameters.AddWithValue("@FirstName", FirstName);

myCommand.Parameters.AddWithValue("@LastName", LastName);
myCommand.ExecuteNonQuery();

myConnection.Close();

}

}

Most of the code is self-explanatory. We get the UserId of the newly created user and the values in FirstName and LastName textboxes.

Then its simple sql database insertion code.